Navigation
SEARCH
This form does not yet contain any fields.

    Entries in cupcake (71)

    Thursday
    May312012

    Fondant Masquerade Masks

                       green with envy fondant masquerade mask

    Join me on facebook... I'd love to see you there

    You are invited to the ball, the Masquerade ball... 

    Special post today on getting more use out of your silicone moulds. Hmmm, doesn't sound that "special" does it? But what you make will be!!

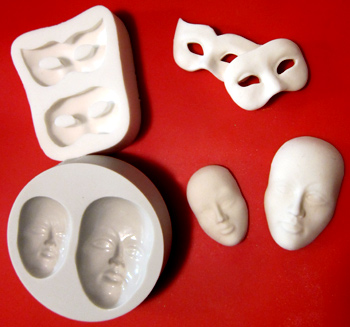
    Don't you love those cake decorating silicone moulds, press in a bit of fondant or modelling paste and hey presto you have a modelled shape in no time. But, but, but, what happens when you have used your mould a few times and you're bored with the shape? Does it end up in the draw with all those other moulds that you just "had to have"? Why don't you try extending the shape, you'll have the time saving aspect of using a mould combined with your own decorating ideas. 

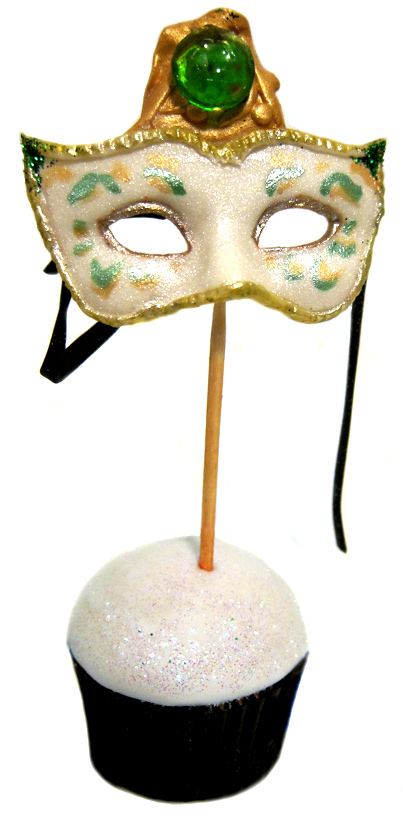
    measuring a tiny 4.5 cm (less that two inches) across the  jewel mask uses the same mould as the green with envy mask in cake one.

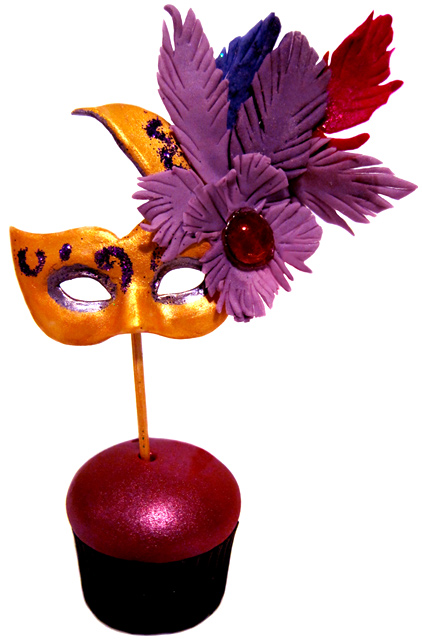
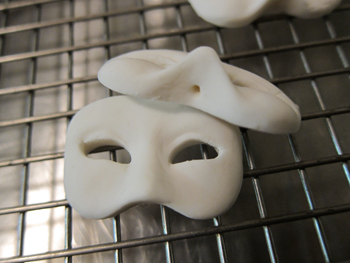
    The masquerade masks on cake one and two today are make with the same mould. Cake three adds a mask to the mask mould and cake four gets it's pizzazz from a side extension. All cakes displayed in fondant covered mini cupcakes today.

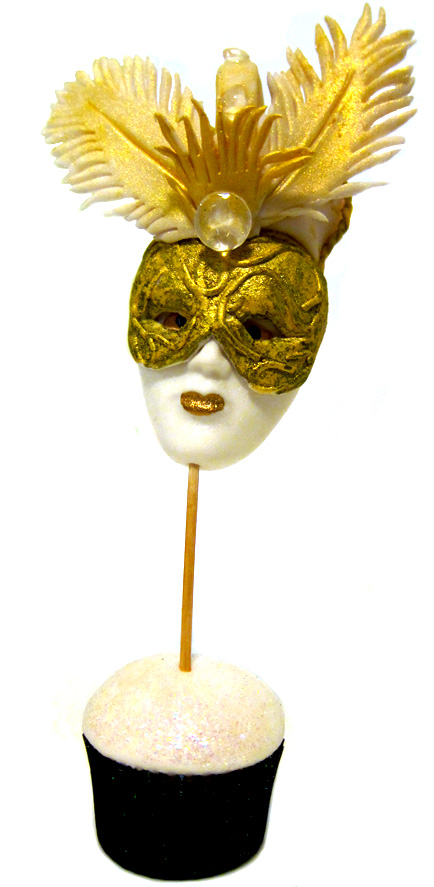
    For the gold and diamond mask I've added a "mask onto the mask"

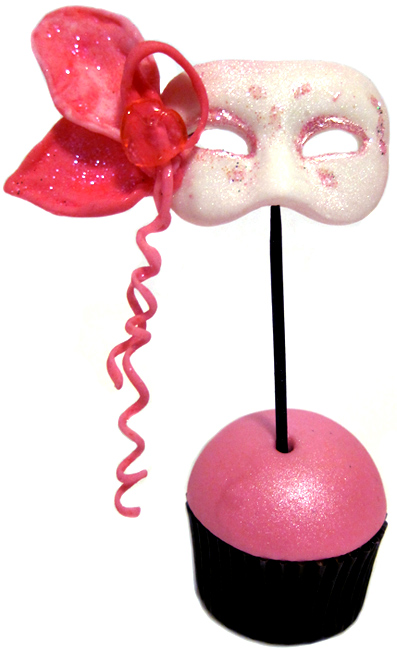
    Pretty in pink mask has a simple side extension added.

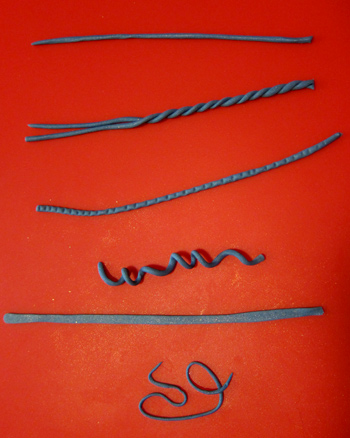
    Extensions to your masks can as simple as rolling a thin snake of fondant, from there you twist, twirl and roll to create trims and ribbon.

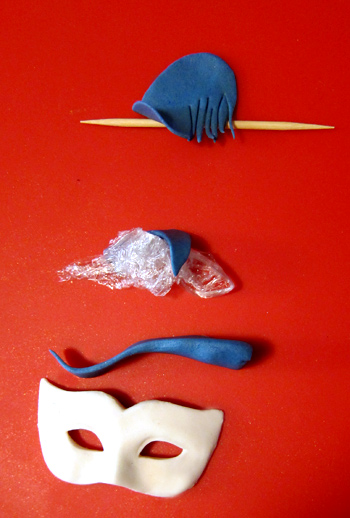
    Create extension pieces by matching the base with mask depth, thinning out from there as required. I use small pieces of plastic wrap to create shapes in the fondant before and after they have been attached to figures. When adding fondant feathers and the like, make sure they are rolled as thinly as possible as you don't want to add too much weight to your pieces.

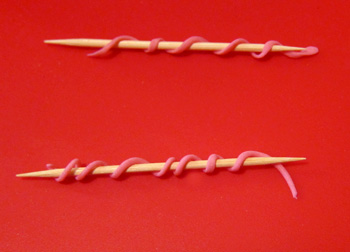
    Use a tootpick/cocktail stick to create twirls.

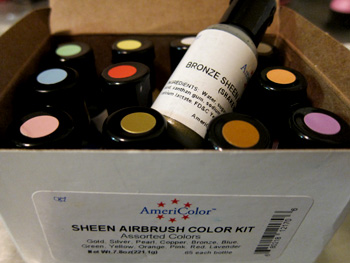
    I used Americolour food spray paint sheen colours undiluted to paint the masks. Try mixing two colours together for a unique finish. A small brush like the type used to paint toy models is ideal for painting trims and details.

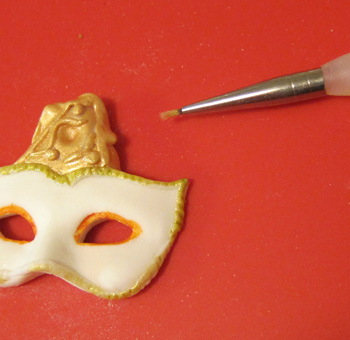
     first of two coats on mask, orange food pen circles eyes before painting to change colour of painted finish.

    All bits and bobs attached with water with the exception of the isomalt gems I attached those with a dab of melted isomalt. Some of the fondant I marbled by twisting several colours of fondant together, I like how that adds a textured element to the feathers. Americolor gel paste was used to colour fondant. Ummm, what else... oh, ok if you want to put your masks on toothpicks make sure you make a hole with toothpick in the unmoulded piece before it hardens.

    Have fun getting more from moulds and happy baking :)

    Stockists: Full face mask moulds from Cakes Around Town (Australia) Masquerade Masks mould from Baking Pleasures (Australia) and Windsor Cake Crafts (UK)

    Baking Pleasures has the airbrush sheen colours in Australia (*note we are paying a lot more than the US price)

    Amazon (US)  

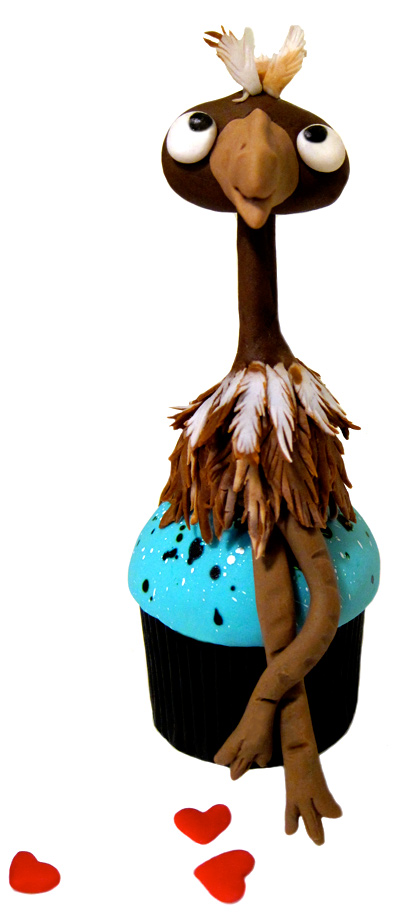
    Want more fondant? How about Eric the Valentine Emu

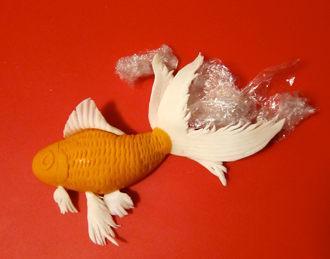
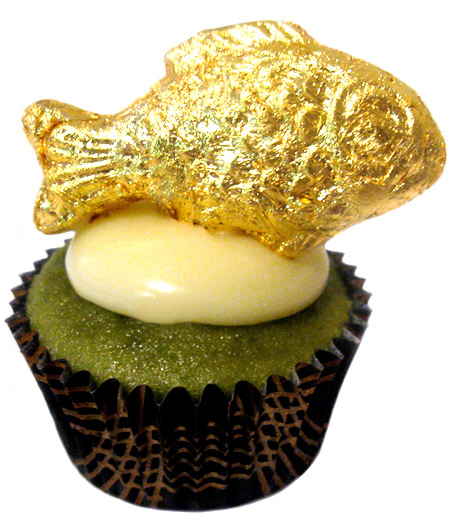
    or go gold with a fondant gold fish

    Tuesday
    May012012

    Wild Hibiscus Mini Cupcake

                                      Wild Hibisicus Mini Cupcake

    Join me on facebook

    The roselle (Hibiscus sabdariffa) is a species of Hibiscus native to the Old World tropics. In Australia we know the roselle plant as 'Rosella'. wikipedia

    Rosella cordial and jam has been made in Australia since the colonial times, popular in Queensland where the Rosella plant flourishes. It's a bit cold where I am for a Rosella plant, but spurred on by successful plantings on the gardening forums I'm going give it a try and plant this spring. It can be grown as a perennial or annual, so I'll be trying to grow this small shrub as an annual.

     image wikipedia commons

    Love, love, love the raspberry/plummy flavour of Rosella jam and can't wait to make a batch myself, but in the interim I have a jar from the supermarket and syrupy wild hibiscus flowers that I used to top today's cupcake.

    wild hibiscus flowers in syrup and rosella jam

    You may have seen these wild hibiscus flowers in a champagne cocktail, though they are equally at home paired with brie as part of a cheese platter or topping a pavlova. Fabulous stuffed with sweet or savory fillings, or try dipping the bases in white chocolate to serve with after dinner coffee.

    I used flowers straight from the jar to top today's mini cupcakes; the rosella flowers are sweet, soft and fleshy with notes of raspberry/plum and rhubarb. 

    For chocolate flowers pat the flowers dry with paper towel before dipping the bases in tempered chocolate. The chocolates can be make ahead of time, with the flowers taking on more of a fruit leather texture as they dry.

    rosella jam; I'll be using this in upcoming weeks

    the petals open and take on an opaque quality as light streams though the glass

    I used soda water in a wine glass for the photo today, to illustrate the bubbles opening the petals of the flower. If you are planning to use wild hibiscus flowers in champagne flutes at a wedding, first test that the flowers open in the glasses you have chosen. You need a champagne flute that isn't too narrow at the bottom to allow room for flowers to open.

    Have fun trying them, happy baking :)

    For cocktail recipes and more visit the official Wild Hibiscus website here

    You can find jars of the flowers in varying sizes in Australia from the bushtucker shop in Europe from Wild Hibiscus shop Deutschland. Plus good kitchen supply and bar supply stores.

    And of course they are available from Amazon too.

    You might also like....

    golden apple cupcake

    recipe mini vienna almond shortbread chocolate bars, topped with gold leaf tipped vienna almonds

    Friday
    Jan202012

    Han Solo Cupcake

    chocolate cupcake, red cocoa frosting, chocolate Han Solo in "carbonite", chocolate pop rocks

    Join me on Facebook

    Lawyers, counsellers and doctors oh my!!

    Well, here I am and the shock of my marriage break up dulled by being caught up in lawyer, counsellor and doctors appointments. 

    Like Han Solo I'm trapped, not in carbonite but in a swirl of paperwork that binds me to my husband. Hopefully I'm not on my way to Jabba the Hutt!!

    Now, lets talk chocolate :) 

    Silicone ice-cube trays double as moulds for your chocolate creations, today I've used the large Han Solo mould for my cupcake topper. Your chocolate tempered or otherwise doesn't have the "high shine" finish of using hard plastic moulds, but this is more than made for with the plethora of designs that are available in silicone. 

    Han Solo ice-cube tray

    I half filled the mould with melted chocolate, sprinkled on chocolate pop rocks, then filled the rest of the mould. You end up with a "Choc Rock Han Solo Block"... or something like that.

    Chocolate pop rocks

    Use food paints and lustre dusts to colour your finished pieces. I sprinkled extra pop rocks and chocolate rocks on the frosting.

    Thank you everyone for your messages/comments of support. I have read them all, please forgive me for not replying at the moment and I'm going to give Valentines cupcakes a miss this year too... but I'll be back in March with "bunnies" and Easter goodies.

    The Lone Baker xx


    Thursday
    Dec152011

    Christmas Rush Raspberry Tuiles 

    Two ingredients (rasberries and sugar) Rasberry Tuile Topped mini cupcake

    Good griefl, I swear I had black and silver cases in "medium", but all I find was mini's. This left me with toppers that were far too large and since I'd already applied silver leaf to black choc candy coated balls I had to come up with a different topper. 

    Two ingredient 'Raspberry Tuiles' have a long oven drying time, but other than that were simple and quick to make fitting in perfectly with "Christmas rush" mode that I'm well and truly in!! 

    Now I did burn the first batch, second batch I reduced the cooking time by 20 minutes and they worked perfectly. I used a metal ruler and a sharp knife to cut strips; I then bent the strips and pinched ends whilst still warm.

    The strips dry quickly to produce a crispy tuile that is intense in flavour, colour and is also vegan and gluten free. They are best made close to serving and perfect to top a range of desserts.

    You just need raspberries and sugar for these... do give it a try and watch chef *David Carmichael the Executive Pastry Chef at The New York Palace demonstrate how the make the tuiles (recipe included).

    *Note: chef Carmichael uses 4 pints (8 cups) of raspberries, I halved the recipe.

     if you use a silpat you will end up with a waffle pattern on the shiny side.

    Happy Baking :) and Christmas preparations!!  

    Monday
    Dec122011

    A Spun Sugar Purple Christmas


    spun sugar purple christmas tree mini cupcake

    Goodness me, I must admit I haven't enthusiastically embraced my husbands choice of "purple" as a Christmas theme but I thought I should make an attempt and produced a batch of fondanted cupcakes... I stood back and they looked far too "menopause mauve". 

    Instead I'll go with purple spun sugar Christmas tree toppers for my mini cupcakes. Watch out for tea light holders in your chosen theme, they make for fab mini cupcake stands like the one I've used today. 

    cream horn form

    To make the spun sugar tree you will need cream horn forms and follow the instructions for one of my earlier posts; blue sugar springs. Instead of using a spoon to create a spring use a kitchen fork to produce threads to wrap around the form. Start of third of the way up and scroll to the top. 

    I used an empty egg carton to hold the cream horns whilst sugar is drying. Sprinkled on edible lilac disco glitter and star sprinkles. 

    Storage: like all sugar pieces trees are best made on day of serving. Sugar work breaks down quickly in a humid enviroment. 

     Have fun, happy baking :) and Merry Christmas!!

    Not enough purple for you? Try purple butterflies.

    Friday
    Dec022011

    Snow Cherries

                                             snow cherry cupcake

    Join me on Facebook... I'd love to see you there.

    A quick little fresh cherry decoration today, that I think is so pretty... hope you do too.

    It's summer in Australia and fresh cherries are in season. "Snow cherries" are a lovely decoration for your cupcakes, cakes and plated desserts for all your Christmas occasions. 

    You'll need...

    room temperature cherries with unbroken skins

    white fondant

    white disco glitter

    small dry artists paintbrush

    small piece of dampened new foam

    Thinly roll out your white fondant, cut small sections and shape. Dampen one side of your fondant shapes with the foam. Pop a cherry in the centre of each piece of fondant and fold up to  attach. Using the dampened foam again, dampen the outside of the fondant and sprinkle with edible disco glitter. Brush off excess glitter that falls on the cherries with the dry brush. Allow to dry.

    Cherries will keep at room temperature for 6 hours (though I have held them as long as overnight). 

    Happy Baking :)

    or what about making mini choc pudding cupcakes?

    you might also be interested in...

    Ode to Bounty Bars Coconut Chocolate Cupcakes

    Monday
    Nov212011

    Three French Hens Cupcake


    On the third day of Christmas, 

    my true love sent to me...

    Three French hens,

    Two turtle doves,

    And a partridge in a pear tree.

    Goodness, birds were just "the gift" in the 1700's if the English carol 'The Twelve Days of Christmas' is anything to go by. As a lady in the 1700's your true love brought you geese, hens, doves, turtle doves, calling birds, swans and a partridge of course... but wait you thought at least there was jewellery?? The "golden rings" most likely referred to golden ring necked birds. But at least you also got some "leaping lords"! All the birds were eaten in era so could have been destined for the pot. 

    Whilst where here, verse four is actually "colly birds" not "calling birds" as often sung; colly birds are a smallish blackbird. French hens in the era were either the Crevecoeur, Houdans or the La Fleche breeds.

    Alternative lyrics: There is Australian versions of the song using Australian animals such as "dingo's dancing", a religious rewrite of the lyrics, though there is no documented religious link to song. I even had the pleasure of hearing a heavy metal version of the song on the weekend... unless you are a Twisted Sister fan I'd give it miss. 

    Want to make your own hens? 

    Black fondant is rolled into egg shapes then shaped into nesting chickens.

    With fondant or modelling paste use red to make wattles and combs and orange for the beaks. Black rolled out thinly is used to cut feathers from. White is rolled into small egg shapes to make the eyes and thinly rolled mauve is used to make the eyelids. Attach all pieces to hens bodies with water using a small paint brush, starting with feathers, then comb/wattle, then beak and eyes. Use a black food marker to finish the eyes. Allow to dry.

    Happy Baking and Singing :) 

    Sunday
    Nov132011

    Gold Fish Cupcake

    fondant goldfish cupcake pick tops a fondant covered jasmine tea cupcake

    Come join me on facebook!  or view my Flickr cake and baking gallery 

    I loved my goldfish, I truly did. I lugged around my fish tank, filters, pumps and paraphernalia from apartment to apartment when I was young. Then the inevitable happened the fish tank sprung a leak and my father said to me "don't worry I'll come over and get your fish and put the fish in my pond" and so he did... where his giant fish proceeded to gobble up my fish in 39.9 seconds! 

    Today we are making a fondant goldfish, mine is flat backed but you can make it 3D the same way. I've added a toothpick to turn it into a cupcake pick.

    Okay let's get started.

    You'll need:

    Fondant (with some *CMC added) or modelling paste in colours of choice

    lustre or petal dusts in colours of choice

    toothpicks painted with food colour of choice

    cake/flower glue (optional)

    leaf glaze (optional)

    Start by making an egg shape with your fondant and shape it into a "fish" shape.

    Add scale indents with the tip of piping nozzle or similar. I wanted lots of texture on my fish, but if you want a more realistic fish make your indents further apart.

    Role out some of the fondant laced with CMC as thinly as you can. Cut fins and tail with a small knife or small scissors, adhere to your fish body with water. Shape slightly to give add the illusion of movement.

    Use plastic wrap or small pieces of foam to support shaped tail and fins.

    Add a ring for the eye socket, add a small piece of thin fondant for the gills, cover the join of the tail with another piece of thin fondant and blend in. Check whether you need to add more scales or any finishing touches. Make a hole in the underneath of the fish with a toothpick. Allow to dry, 6 hours to overnight.

    Once dry take a small dry paintbrush and dust with colours of choice, starting with the back of the fish. I used white lustre dust and red petal dust. Blend, blend, blend with your paintbrush until you have desired finish. You can let the base colour show through like I did or fully cover with the dusts. 

    Dip you toothpick into cake/flower glue or dampen with water and insert into the base of the fish. Add the eyeball to your fish with a little black fondant, glaze with leaf glaze if desired. That's it! You have your self a fish cupcake pick.

    Happy Baking :)

    *CMC powder, modelling paste, leaf glaze, cake/flower glue, lustre dust and petal dust are available from cake decorating suppliers/shops. 

    or how about going a little Japanese with a chocolate goldfish covered in gold leaf

    Then there is roses made from Starburst fruit chews.

    Friday
    Nov042011

    An Australian Kind of Christmas Cupcake

                    an Australian kind of Christmas cupcake

    Without a large showing for Halloween and no Thanksgiving, Australians go into "Christmas mode" very early. Christmas work parties are on, shopping centres are crowded and puddings are being boiled. 

    Blue skies promise a hot and sunny Christmas and your not Australian if you haven't sat outside perspiring on a 40 Celsius (104 F) Christmas day, swatting away flies and eating a steaming hot bowl of your Aunt's special Christmas Pudding. 

    Regardless of the hot weather we hold onto our British heritage, so along with the BBQ prawns and couscous salad there will be a hot roast turkey dinner or two, puddings, shortbreads, fruit mince pies and national dishes from the many different nationalities that make up Australia. 

    It can all make for a hodge podge type of meal, but I love it and it's "us"... we have hot roast turkey and duck fat roasted potatoes and all the trimmings plus we have cold seafood and salads. Chocolate peppermint ice-cream pudding for dessert, with left overs and hot puddings to be served on Boxing Day. 

    Today's Koala holding onto a Christmas pudding cupcake is topped partly with fondant and part fondant/modelling chocolate. The 50/50 fondant modelling chocolate is easy to work with when making figures, I do like white fondant for the white details. Happy Baking :)

    The modelling chocolate recipe I used is here

    Hubby Mark is 41 and still hasn't seen snow... but he does love Frosty the snowman.

    Friday
    Oct282011

    Seahorse cupcake and bubbles in silicone moulds

                                         seahorse cupcake

    Join me on Facebook

    Goodness, sorry I'm sooo behind in answering mail... I'm answering one today, and I can hear many saying "about time!!!". It's a question about using a gas torch to remove the bubbles created in pieces of isomalt when you are using silicone moulds. 

    hi, I tried to use a butane torch like you did on the butterflies on my isomalt pieces but I couldn't get rid of the all the bubbles and created a melted mess. What am I doing wrong? 

    Vicki

    Hi, Vicki you didn't say what moulds you were using but I presume it's something small or with finer detail? I thought I do an example piece today to illustrate... 

    An isomalt seahorse straight from the silicone mould. Tiny air bubbles cover the surface of the piece. 

    To remove the air bubbles wave the flame of a chef's gas torch over the surface of the piece.

    You can see in this shot I'm part way through torching, I've lost a little of the detail but not much. The fin of the seahorse is thin, I give it another quick flash of flame but I won't keep going to remove all the bubbles as I would be risking melting the piece. 

    Note the photo on top of page, I photograhed in front of white card so you can see how there still is few small areas of bubbles. However to the naked eye they are difficult to see. 

    Finally, my torch is very small it is possible your torch is more powerful? If that is the case, perhaps invest in a small chefs torch as they are relatively inexpensive nowadays. Hope this helps you Vicki.

    Happy Baking :)

    You might also be interested in Sugar Glass Butterflies